How your student list is organized
Last updated: November 6, 2026
The In Person Attendance page lets you record daily attendance for students who come to school in person. You can mark a whole class for a day in a few clicks, add notes, track breakfast and lunch if your school serves meals, and print or download the results.
Who can use this page
Teachers see the students in the sections they teach and the students on their caseload, and can record attendance for them.
School admins see and record attendance for every student enrolled at their school.
District admins see and record attendance for every school in the district.
Read-only admins can view the page, filters, and notes, but can't make changes.
In Person Attendance is turned on per district. If you don't see it in your sidebar, contact Scout support to have it turned on.
Opening the page
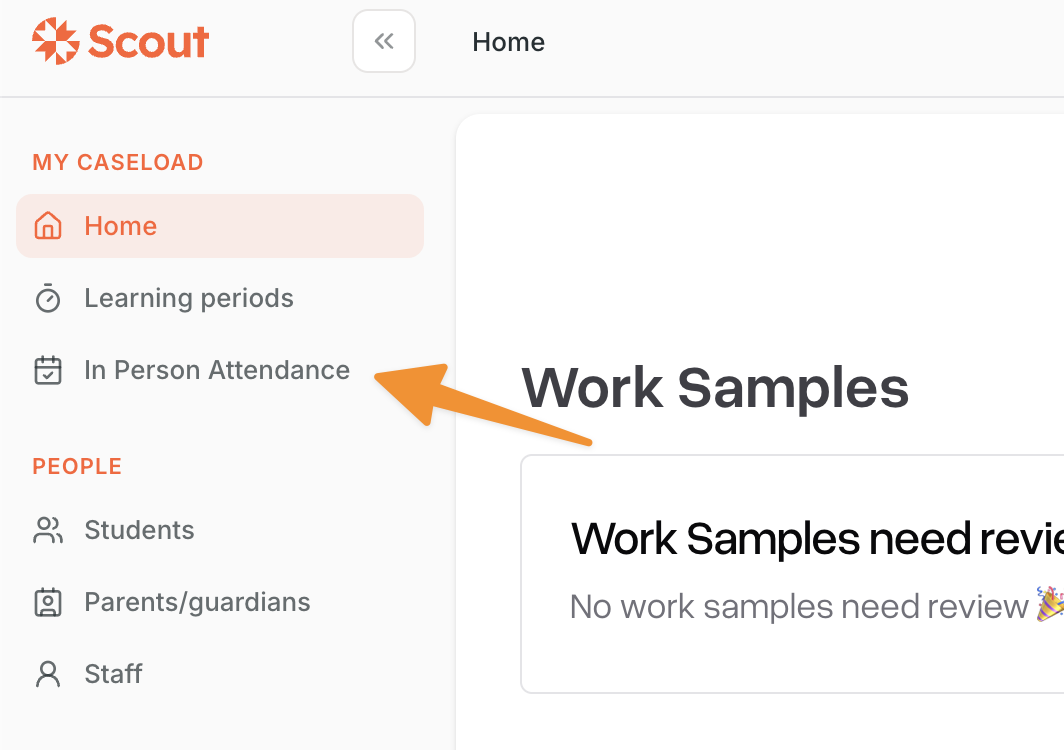
In the left sidebar, find the My caseload group.
Click In Person Attendance.
The page opens on the current week (Monday through Friday). Each row is a student, and each column is a school day.
Teachers see students grouped under Caseload, then under each of their sections, then Other. A student who is in more than one of your groups appears in each one. Admins see one list of students.
Choosing which days to see
Use the dropdown at the top to switch between Day, Week, and Month.
Use the left and right arrows to move to the previous or next range.
Click the date range between the arrows to pick your own start and end dates. The dropdown will then read Custom.
Only school days from your school's calendar appear as columns. Today's date is highlighted.
Recording attendance
Select the cells you want to mark. You can:
Click a single cell (one student, one day).
Hover over a date at the top of a column and click Select all to select every student for that day.
Hover over a student's row and click the checklist icon next to their name to select all of their days.
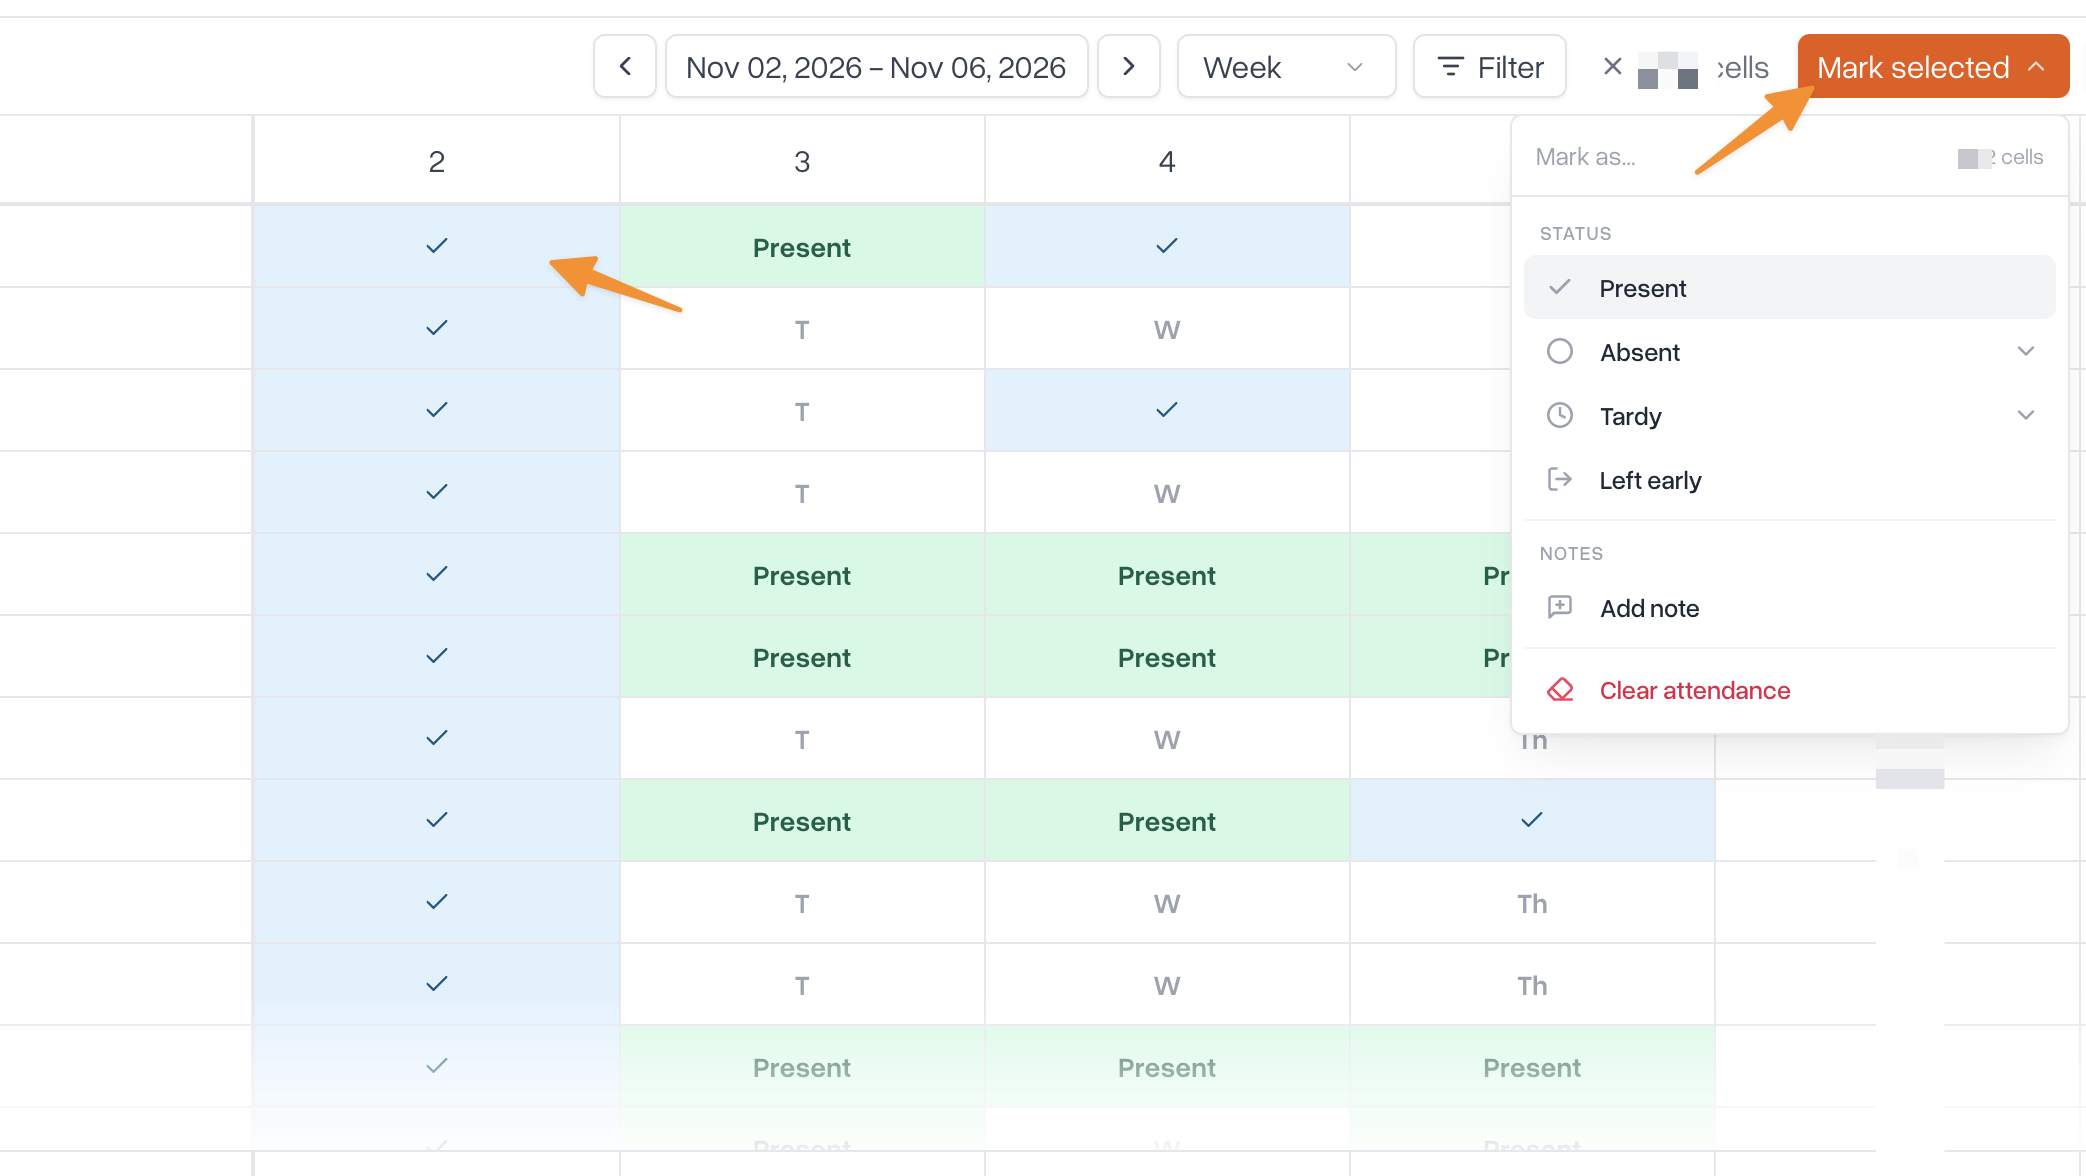
Selected cells turn blue with a checkmark.
Click the orange Mark selected button at the top of the table.
Under Status, choose one:
Present
Absent, then Not excused or Excused
Tardy, then Not excused or Excused, then how late: Under 30 min, 30 min – 2 hrs, or 2+ hrs
Left early
Click the green Apply row at the bottom of the menu (or press Enter).
Your changes save right away and a confirmation reading Attendance saved appears. There is no separate Save button.
Changing or clearing a day
To change a status, select the cells again, choose the new status in Mark selected, and click Apply. To remove a status entirely, select the cells, open Mark selected, and click Clear attendance.
Future days
You can't record attendance for a day that hasn't happened yet. If your selection includes future days, the Status section shows "not available for future days." You can still order meals for those days (see below).
Reading the table
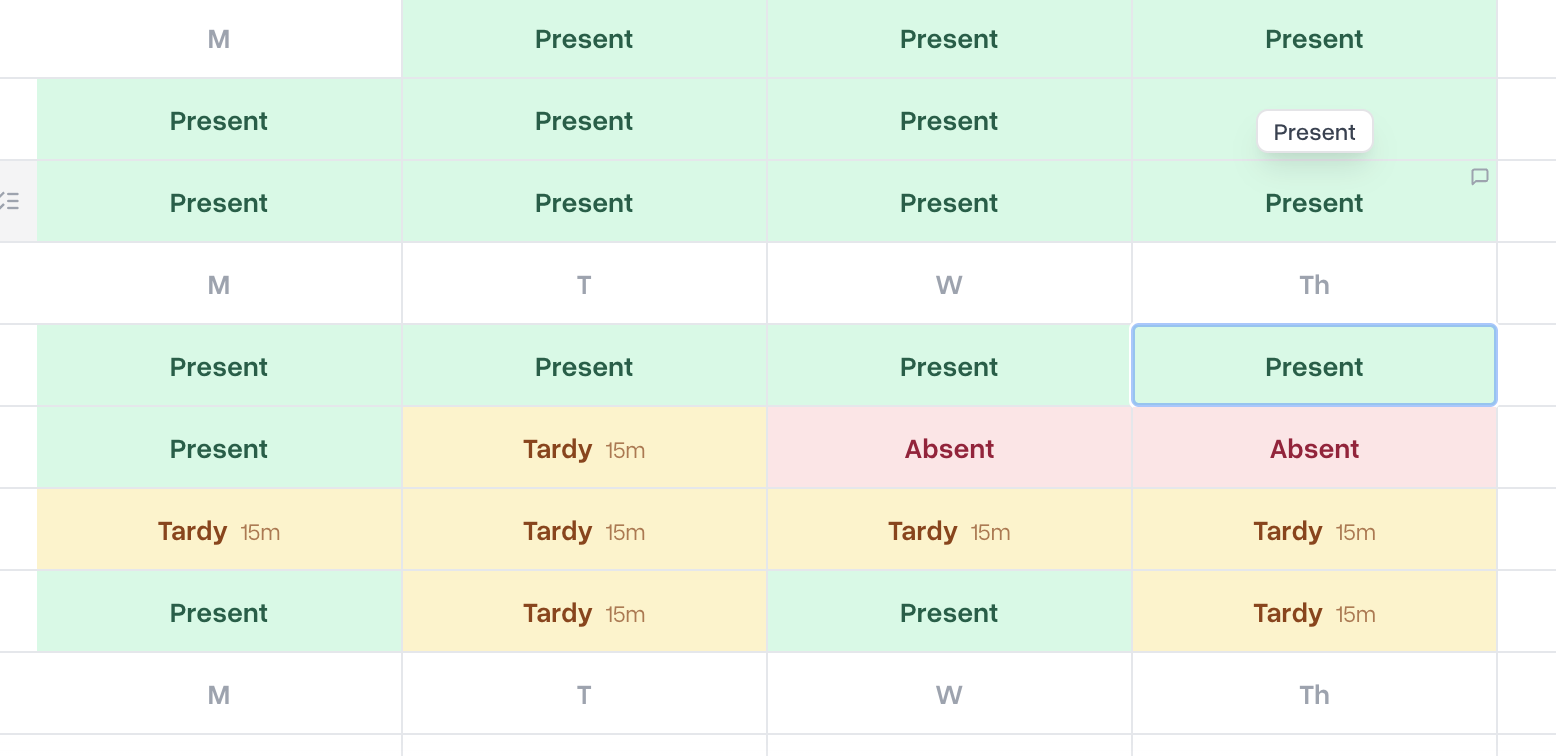
In the Week view, cells show the full status. When more than 7 days are on screen, cells show a short code instead:
P: Present
T: Tardy (with how late, for example "15m")
ET: Excused tardy
A: Absent
E: Excused absence
LE: Left early
A cell that only shows the day's letter (M, T, W, Th, F) has nothing recorded yet.
Some cells are gray and can't be changed here:
NE: the student wasn't enrolled that day.
IS: the student was on short-term independent study. Change this from the Programs tab on the student's profile.
SU (suspended) or EX (expelled): set by a behavior incident. Change it from the incident.
ISS (in-school suspension) days can still be marked. Scout shows a reminder when you select one.
The Att. rate column shows how many of the student's school days in the range they attended. Present, Tardy, Excused tardy, and Left early all count as attended. The bottom row shows totals for the range; click it to switch between attended, tardy, left early, excused, and absent totals.
Tracking breakfast and lunch
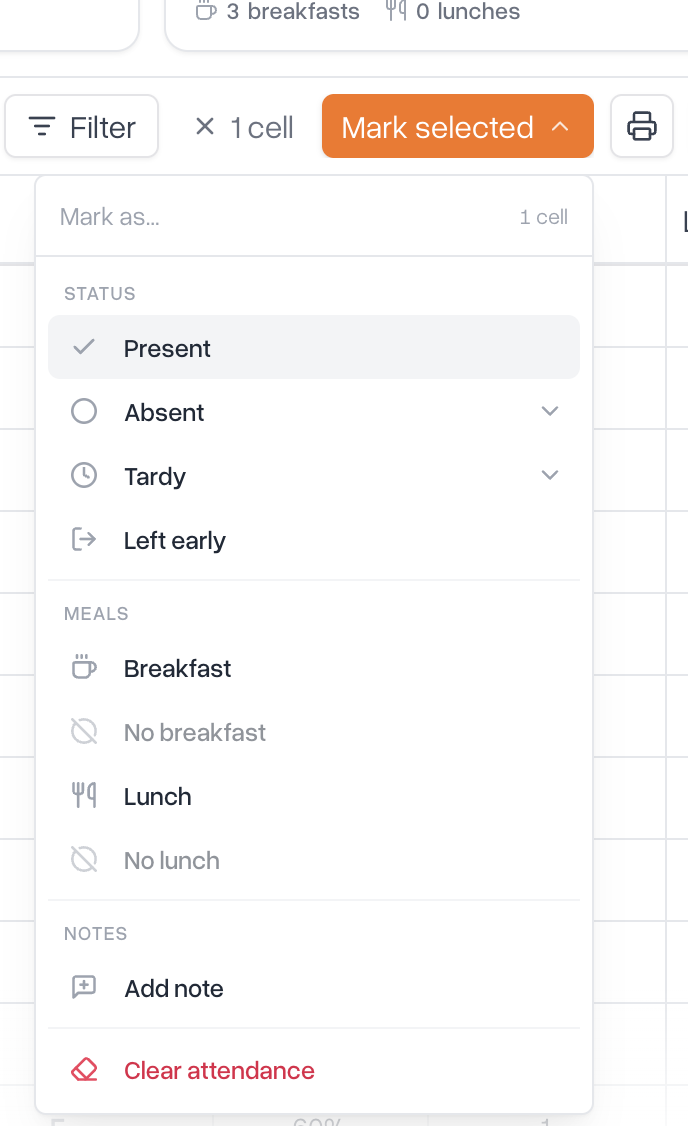
If your school serves meals, the Mark selected menu has a Meals section and the table has Breakfast and Lunch columns.
Select the cells.
Click Mark selected.
Under Meals, choose Breakfast and/or Lunch. On future days these read Order breakfast and Order lunch, so you can order meals ahead of time.
Click Apply.
Cells show a small B or L when a meal is ordered. A faint letter means the meal is ordered for a day that hasn't happened yet. A letter that is crossed out means the meal was ordered but not received.
A few things happen automatically:
Marking a student Absent marks any meal for that day as not received.
A student who is tardy 2+ hrs can't get breakfast that day, but can still get lunch.
Choosing a status never adds a meal by itself. You add meals separately.
To undo a meal, select the cell, open Mark selected, and choose No breakfast or No lunch. Then pick:
Not received: the meal was made but the student never took it. This counts as food waste.
Never ordered: deletes the meal record completely.
On future days this option reads Cancel breakfast order or Cancel lunch order.
Adding notes
To add one note to many cells at once:
Select the cells.
Click Mark selected, then Add note.
Type your note and click Add to [number] cells.
A cell with notes shows a small speech-bubble icon in the corner. Click it to read the notes for that student and day, or to add another one. You can edit or delete your own notes. School and district admins can edit or delete anyone's notes.
Searching and filtering
Use the search box above the table to find a student by name. Click Filter to narrow the list:
Filter by school (when your district has more than one school)
Filter by learning center (when your school has learning centers)
Filter by grade
Filter by attendance: shows students with at least one day of the chosen status in the date range
Filter by meal status (when your school serves meals)
Admins also get Filter by teacher of record and Filter by section. Scout remembers your filters the next time you open the page on the same browser. Click Clear all to reset them.
Summary cards
The cards above the table summarize the date range you're viewing:
Attendance: the percentage of school days attended, with a breakdown of present, tardy or left early, and absent.
Breakfasts and Lunches: how many meals were served and ordered, and how many were ordered but not received.
Student: click Select a student to see one student's attendance rate and totals for the range.
Each card has a switch. Turning a card off hides that information from the table cells, which is handy when you only want to look at meals or only at attendance. Click Expand table to hide the cards and give the table more room.
Printing and downloading
Print PDF creates a printable attendance sheet of exactly what's on screen, including your search and filters. A preview opens first.
Download CSV downloads a spreadsheet with one row per student, one column per day, and the attendance rate and meal totals. The CSV includes every student in the date range, not just the ones matching your search.
Common questions
I don't see In Person Attendance in my sidebar.
The page is turned on per district, and only teachers and admins can open it. Contact Scout support if your district needs it turned on.
A student is missing from my list.
Teachers only see students in their sections or on their caseload, and only on days the student is enrolled. Check your filters and the date range, then check that the student is enrolled in your section for those dates.
Why can't I mark attendance for tomorrow?
Attendance can only be recorded for today or earlier. You can still order meals for future days.
Why is a cell gray?
The student wasn't enrolled (NE), was on short-term independent study (IS), or was suspended or expelled (SU/EX) that day. Independent study days are changed from the student's Programs tab, and suspension days from the behavior incident.
A day already shows Present, but I didn't mark it.
Approved in-person engagement, like a section marked "attended in person," fills in Present on this page automatically.
I don't see meal options in the "Mark Selected" Tab.
If you can't see meal options in the "Mark Selected" tab it just means your school doesn't offer that service.